Wednesday, April 3, 2013

Let's talk veggies

We can all grow good simple food. It is considerably cheaper than the grocery store, not to mention better for you and YUMMY! While it may sound like it takes a big yard, there are many veggies you can happily grow on your porch in containers. When the robins start pecking, time to start planting! When the rain is coming, time to plant seeds and set out your transplants. Start the tomatoes indoors in pots, in a bright window or in the greenhouse. Tomato seeds are best sown 5 to 6 weeks prior to the last frost date, and can be worked up in successively larger pots until transplanting. Space plants at least 2 feet apart in every direction. Caging them will help support the vine and keep the fruit off the ground. To produce the best-tasting fruit, choose a very sunny location and water deeply and infrequently.

Peas are best planted directly into the garden a few weeks before the other common spring vegetables such as beets and carrots. For peas, choose a sunny, moist location where there is mellow garden soil (make sure its been at least 6 months since the last application of compost). Peas must not be planted too deeply--do not be fooled by their large size--they're pansies about germination and don't like to push through too much dirt. Each pea seedling is precious--do not thin them! Instead provide a trellis (chicken wire is really the best) stretched between a couple of 4-foot wooden stakes or fenceposts, located directly above the seedlings and along the row. Don't dally about the trellis--if peas don't start climbing early they tend to stunt! Keep the rows at least 3 feet apart, and weed very carefully so as not to injure the fine roots of the peas. If you catch the season correctly, peas can provide a great deal of food in season.

Once your peas are up, start thinking about planting beets, carrots, cooking greens, salad greens, and onions directly in the garden. Make shallow furrows about 2 feet apart on the soil surface, sprinkle in the seeds and barely cover with soil, then tamp securely and keep the new planting evenly moist until germination. Cultivate between the rows to remove any weeds before they get big enough to compete. When the seedlings develop their second set of true leaves, thin them out to give sufficient room for the development of the mature plant.

In the late spring, after the soil has truly warmed up and all danger of frost is passed, sow the beans, corn, cucumbers, and squashes directly in the garden. You may also wish to plant more of the cooking and salad greens at this time in order to assure ongoing harvest into the summer.

Corn is best planted in a block of at least 3 rows, with rows 2 feet apart. Planting in this manner assists in pollination and development of full ears. Make the furrows about 4 inches deep, sprinkle composted chicken manure in the bottom of the furrow, drop the corn seeds (1 every 4 inches or so) in the furrow, then cover with soil and tamp securely. Water thoroughly after planting, but then hold off on the water until the corn shows above the ground-hot, sunny, dry days provide the best conditions for germination, and a hard crust on the surface makes it difficult for crows to pull up the seedlings. After the seedlings reach 3 inches or so, thin them to a foot apart, and cultivate frequently and shallowly, pushing soil up around the plants as they mature (in order to give them more wind resistance).

Beans are best planted in rows near the corn, as they benefit the corn with their nitrogen-fixing roots. Beans must be kept carefully weeded in order to assure uninterrupted growth and ease of picking the green pods.

Squashes and cucumbers are best planted in hills. Mound the soil generously (about 3 feet across and 6 inches tall) and plant 7 to 10 seeds in each hill. After germination, thin the seedlings to 3 per hill, and cultivate frequently to deter weeds. These plants must not be over-watered, as too much water can rot the fruit. Keep the summer squashes and cucumbers picked at early maturity, as they taste better that way, and the plant will be stimulated to produce more flowers and fruits.

In these days of higher food prices and questionable "big ag" practices there is really nothing better you can do to feed yourself and bolster your self sufficiency than to grow your own food. This is a life skill easy to learn now, before grocery stores are bare. You can do this, I believe in you.

Tuesday, April 2, 2013

DIY Natural Mouse Deterrent

We wanted a natural way to deter micky from coming in before encountering our cats so
we made several peppermint repellents. We also grow 2 kinds of mint by our front door in a
planter that helps keep pesky insects away from the door with the bonus of using leaves in teas and adding a nice welcoming scent.

You don't have to grow mint to enjoy the benefits. Peppermint Oil is readily available retail.

1. items I used: cotton balls, peppermint oil (I added peppermint leaves too), empty
prescription bottles, drill and small bit

2. 2 drps oil per cottonball, 2 cottonballs per container (plus 2 leaves)

3. drill 3 holes in lid, 1 in bottom

4. label container with sharpie or a label so when you come across it in your shelf you know
what youre looking at.

I placed them under sinks, under dishwasher, behind washing machine, around supplies, in she'd. Mice are put off by the smell of peppermint and will stay away.  Refresh every 6 months our second line of defense if a mouse does gets in, our cat will eat it.

Tuesday, December 25, 2012

Merry Christmas Y'all ~


Friday, October 12, 2012

FRIDAY's Stockpile for CHEAP


Why would anyone want to stockpile for less?  Well if you have time to prep and do all the prepping research then you have time to save money on the things you buy.  We don't pay full price and neither should you!

Let's look at it this way ~ what is the number one problem with stocking up on water water water....  I don't care how good your water is you or your family will get tired of just water.  That's called water fatigue.   And I imagine that's why someone picked leaves to put in the water and made TEA.....

What if I told you that you could order HUNDREDS of packets of koolaid for roughly $5

Kool Aid is having a National Catalina (Coupon that prints when you buy a featured item)  this month at KMart if you buy 21 envelopes of Koolaid for 10 cents it will print a $2 off your next purchase coupon.
you can use that on your next purchase of Koolaid, so you buy 21 MORE for 10 cents each ($2.10) minus the $2 coupon and you just got 20 envelopes free! Guess what, it will print ANOTHER COUPON for $2 off, so you keep "rolling" until you have bought as much Koolaid as you want to stock up on...$5.10 plus tax would get you 651 packets of Koolaid....  that's 31 transactions.... so be prepared to hang out at Kmart for a while. It's worth it to prep for less!   Want to learn more?  Click on the We Use Coupons button for more info.

Thursday, September 6, 2012

Hot Food is Important

Here's three ways you may NOT have thought about cooking, but could be interesting. We have an alternative to charcoal, DIY stump oven, and DIY solar oven.  Hot food during a crisis is important.  It gives us comfort and soothes rattled nerves and is all around good for family morale.

Bic FlameDisk
Bic has introduced a new product it's called the FlameDisk.  The major flaw with this product is its fuel. according to the product's website  "FlameDisk uses ethanol as the main fuel ingredient. Our ethanol comes from corn, a renewable resource. "  Yeppers there's a hitch in that plan with an 80% failure in this year's corn crop.  This product may end up to be hard to find.   It does look interesting, and is extremely easy to use.  Seems it would be an excellent item to have in your preps for emergency cooking.  Here it is in the bottom of a Weber grill.  I think based on the shape it's perfect for kettle type grills such as Weber. the cook time is expected to be 35 to 45 mins.  We have stocked some of these because its easier than stocking charcoal for the grill, and we can barter them.

Items Required: Grill, Lighter, Bic FlameDisk


Here's the link to Bic's site:  FlameDisk


DIY Tree Stump Grill
This just looks like FUN.  If you're cleaning debris from a storm and your chainsaw is handy give this a try.


Items required: Log, Chainsaw, newspaper


  1. Cut the log evenly on both sides so it stands up freely. Then cut it into vertical segments most of the way down the length of the log.
  2. Stuff in some newspaper into the cracks as deep as you can get it, leaving a wick at the bottom, and light it up.
  3. That's all there is to it—the log burns from the inside out, and you have a simple, handmade stove....

DIY Solar Ovens:


You don’t need four burners and a gas line to make some great-tasting trail food. All you need is plenty of sunlight. Make your own solar oven and feed the whole group. Solar ovens work by bouncing sunlight off a reflective surface into a pot. The hotter the pot, the faster your food will cook. It’s easy to make—and cheap.  
You can make your own! Lots of plans online, and Boy Scouts everywhere have done this as a camping project, with that said there are many Solar Ovens you can buy.  They can be pricey, and the sun has to be shining.  Also it takes a long time to cook in a solar oven.  There are many more designs online, but this one will get you started. Here is an example of a Boy Scout solar oven:
WHAT YOU’LL NEED:
  • A pizza box
  • Black construction paper
  • Aluminum foil
  • Plastic window covering
  • Permanent marker
  • Glue
  • Tape
  • Scissors
  • Ruler
  • String
WHAT YOU’LL DO:
step-1.jpg STEP 1: Line the inside bottom of the box with foil.
step-23.jpg  STEP 2: Cover foil with black paper and tape in place.
STEP 3: Set the plastic under the box and trace the outline of the box.
step-4.jpg  STEP 4:Remove the box and draw another outline 1⁄4-inch inside the first outline and cut along inside line.
step-56.jpg  STEP 5: Close the box cover, and draw another line 1 inch from each side.
STEP 6: Cut along the lines on the front and sides—not the back.
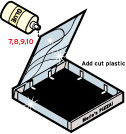
step-78910.jpg  STEP 7: Open the cover and line the inside with foil.
STEP 8: Glue foil in place.

STEP 9: Cover foil with the cut plastic and tape in place.

STEP 10: All layers should be airtight and wrinkle-free.
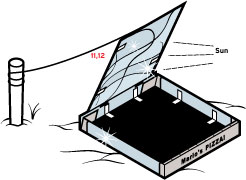
step-1112.jpg  STEP 11: On the outside of the box cover, attach a string long enough to keep the flap open and let the sun shine in.
STEP 12: Once you have the oven, all you need is the sun. Choose a spot that will get at least several hours of direct sun away from any strong wind.
TRY IT OUT


Solar cooking takes a little practice. Try this recipe first:
Solar Oven S’mores  Ingredients:
  • Graham crackers
  • Milk chocolate bars
  • Marshmallows
Place graham crackers next to each other on the bottom of a black cast-iron pot. Black pots are best because they absorb and retain the sun’s heat better than light-colored pans. Top each cracker with a piece of chocolate and a marshmallow. Put a glass lid over the pot and place the pot in the center of your solar oven. When the marshmallow is gooey, take out the crackers and add the second layer of graham crackers on top to complete it.
----------------------------------------------------------------------------------------
What did you do today to Prep?   Today We placed a bulk order for 400 items.  Retail was $910 when we applied our coupons we saved 95% our out of pocket will be $50 plus tax.  Pick up is Saturday. Prepping for less is important.  We didn't have $910 for these items but we did have the $50  If you don't use coupons you should seriously consider it.
____________________________________________________________________________
Note:  Happy Birthday Dad. We love you.

Wednesday, September 5, 2012

Prep Today?


What did you do TODAY to prep?  Anything? Buy a small bag of beans?  an extra can of soup? Are you a small scale prepper?  Maybe a large scale prepper? Something as small as keeping the dishes done and the laundry clean counts a bit towards prepping.Why? Can you imagine if you had five loads of laundry and a stack of dishes to do but no power? So in that sense yes housework is prepping; keep your house in order.

For September I issue this challenge to you: Do something however small to prep everyday this month. Everyday along with a regular message I will update what we did that day to prep. 

Here's a recap so far on what I've done.  Keep in mind I also do research daily.

  • 1st  Saturday Placed Pre-order for 400 Zone Bars Pick up Tuesday cost: near free; Hubby ("THE" Prepper) attended HAM festival and purchased additional communication equipment
  • 2nd Sunday Placed Pre-order for 100 Bic FlameDisks (free via coupon) Pick up Thursday
  • 3rd Monday Updated and reorganized BLOG; started annual inventory of supplies
  • 4th Tuesday Picked up Zone Bars, clipped Coupons from 8-26, made list of items to watch for sale, checked coupon website to track which stores would give me biggest bang for our buck, placed an order for interesting books and a few "items"
  • 5th Today placed order 25 pounds of honey powder and new pool cover, special ordered 100 packs of Yakisoba to donate to food bank sourced location for pallets for fencing

You are not in the journey alone.